

 Cars
Cars
 Trucks
 Buses
Buses
 Motorcycles
 Military
 Electronics
 Guns
Guns
 Buildings
 Aircraft
 Furniture
 Characters
 Animals
 Spacecraft
 Food
Food
 Ships
Ships
More
 Hello. My name is Alexander. I’m from a small town of Zhmerynka, Ukraine. At the moment I live and work in Kiev. My main specialty is advertising, trade and exhibition equipment design; I also draw by hand. You can see my works in my portfolio and in my social network group.
You may notice that I don’t have complex works on modeling and visualization. VW Kafer became a special challenge for me and a kind of examination, a chance to see, what I have learned over the past few years.
“Old Runner” was made special for the “Most Legendary Car” competition. I learned about it on this page and I’m very grateful to the author for his publication.
As I wrote before, in the legend for the competition, I had already tried to model this automobile and it ended in failure. But I still had my old render:

At first glance, it may seem a good start, but in fact I hadn’t really cared about the correct topology so I couldn’t continue this model.
For a start, I needed the most accurate drawings of the vehicle. This is an old model and it also has about 15 modifications, that’s why finding the right ones wasn’t easy. After digging up websites with ready-made drawings and references I decided to search for documentation. As a result, I came across the necessary drawings on some German site.

The next step is to define style, color, environment and elements for detailed elaboration.
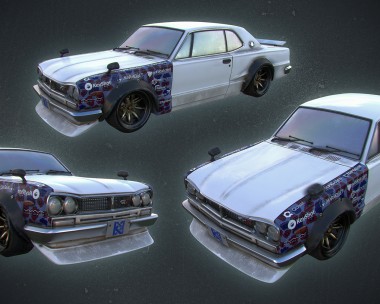
I wanted to make a Hot Rod style model with low-key colors, but that is hard to overlook. I decided to combine dark gray and white colors with red elements. Window stickers, clean chrome details and specific curves contributed to the right impression. From the very beginning I knew that I want a night scene. It is more difficult to make lighting in such scenes, but thanks to bright spots and blinks you can get an interesting result. Here are the images (only the most impressive) that I got inspired with.

Next, I began searching for the separate car body parts, mainly looking through advertising for sale of Volkswagen parts on EBAY and other sites.

I found many parts as required, during the process of modeling already. When the work was done I had about 500 references.
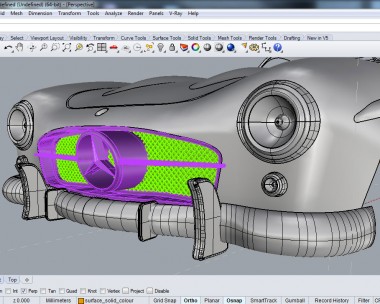
Naturally, I began with drawing a box and laying the drawings on it.

Then the process of modeling and texturing began. I’m not going to describe it in detail. You can find plenty of information about it on the Internet. I’d like to highlight just a few moments.
Using 3Ds Max layers is mandatory for me. I find this very convenient; it saves computer resources when working in Viewport and, if necessary, you can always use separate details.
Here is my list:

Speaking about texturing process: only car body painting is worth mentioning. I applied here a double blend material that includes two “metalics” (dark gray and white), red glossy strips to divide them and two transparency maps.

Body layout.

During the process of modeling I tried a few variants of painting and angle.

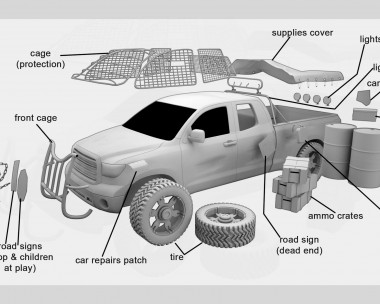
In this picture you can see the overall view of all objects that were used when rendering.

To draw smoke coming from the exhaust pipe I used FumeFX objects. In the above image these are orange boxes with sources of smoke and wind.
Under the car I centered HDRI lighting.
To make shadows and light spots I applied VRAY Matte/Shadow material in VRayPlane.
The environment is also a HDRI map.
After the final visualization and camera adjustments I started the process of rendering. It took about one hour and 40 minutes – I just don’t remember the exact rendering time.

After rendering I got 9 output layers: RGB_color, Alpha, Background, MatteShadow, Reflection, Refraction, Shadows, Zdepth, LightSelect.

Post-processing was performed in Adobe Photoshop. I also added few highlights with the help of Knoll Light Factory plugin. And here is the final image:

Clay render.

A little bit later I’m planning to modify the model. I’d like to add more details, finish the interior, engine and to model the environment.
I hope this «making-of» was interesting and, perhaps, useful).


Add a comment