 Autos
Autos
 LKW
LKW
 Busse
Busse
 Motorräder
 Militär
 Elektronik
 Waffe
Waffe
 Gebäude
 Flugzeuge
 Möbel
Möbel
 Charaktere
 Tiere
Tiere
 Raumfahrzeug
 Lebensmittel
 Schiffe
ansehen
In this article I’m going to share with you my observations (somebody will take them for advice, other people is going to open a new world), which may help you simulate clothes in Marvelous Designer 3 (MD3) more efficiently.

Perhaps, many of you are annoyed by the fact that MD3 is not using all cores at 100% during simulation. If you already found the option “Number Of CPU In Use” and set up there a value equal to the number of logical cores on your computer, and still the cores are not loading at 100% – just keep reading this article. If you still didn’t find it, do it, feel the difference, and only then keep reading.
It turns out that cores will boot to the maximum, if we reduce the distance between particles, which means that we will increase the number of polygons.
It seems in theory that if we increase the number of particles up to a certain point, it is possible to achieve the increased simulation quality for free, due to unused cores. But after a couple of experiments, I proved that it is not so. See for yourself.

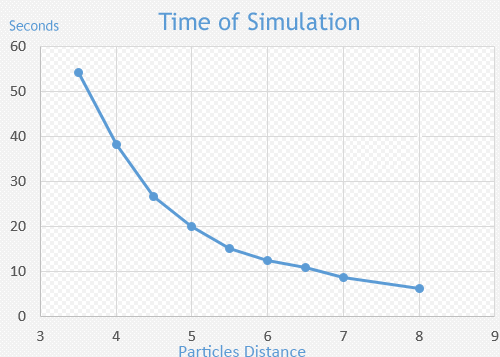
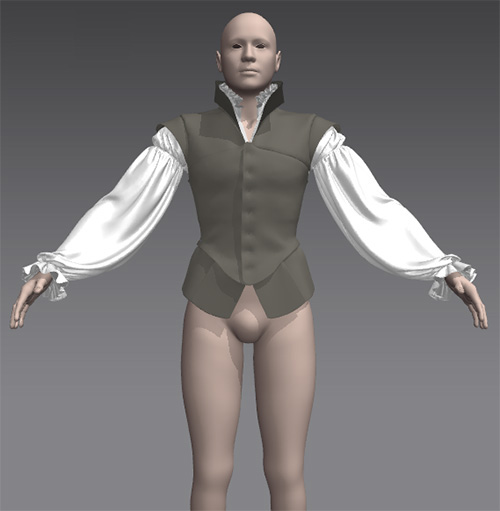
This graph shows us the ratio of simulation time in MD3 to the number of polygons on the fabric. For my experiment I’ve used these clothes with complete settings:

In the normal state (when there are no glitches, eversion, waves and tangled fabric) for the above mentioned clothing, with particle distance of 5 mm, MD3 eats 1.4 GB of RAM and 40% of CPU resource (particularly, on my computer) throughout the whole process of simulation.
Thus, I’ve concluded that the more polygons clothes are made of, the more processor resource and the more RAM Marvelous Designer 3 eats.
As you can see on the graph above, the power ratio is:
Y = 1400/X2.6, where:
Y – time of simulation;
X – distance between particles;
1400 – my cloth rate (the yours will be different).
That is, roughly speaking, to understand how much simulation time increases, we need to multiply the distance between particles by itself three times.
For example, if the distance between particles was 10, thereafter, the simulation time Y = 1400 / (10*10*10) = 1.4 seconds, then, when particle distance is reduced twice (down to 5), the simulation time of one single shot will increase up to Y = 1400 / (5*5*5) = 11 seconds!
Eight time longer! Although, the distance between particles was reduced only twice. Conclusion: we should be very careful when working with particle distance parameter.
In the settings of simulation quality there are such parameter as “number of simulation”, which is responsible for the number of simulations done during one single shot. The default setting is set to 5. It means that between each shot MD3 will simulate five times the conducts of your cloth. It averages these conducts and shows the average coefficient.
In that way, increasing of this parameter helps (in theory) get rid of a small jitter of 3D tissue. In practice the effect is very insignificant (or, maybe, I’ve just come across such cases, that the difference wasn’t that big).
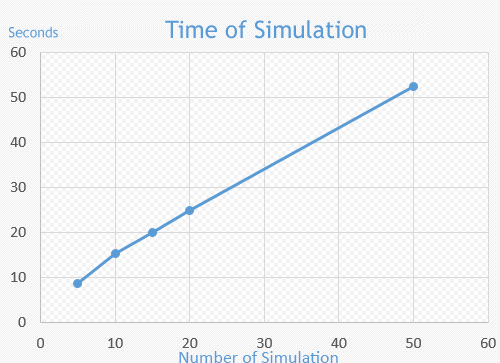
Here is a graph where you can see the dependence of cloth simulation speed to the “number of simulation” parameter.

We get here a linear formula:
Y = 0.95*X + 5, where:
Y – time of simulation;
X – number of simulation;
5 – my cloth rate (yours will be different).
Conclusion: the number of simulation means EXACT NUMBER of simulations. I. e. if you have 5, and you’ve made 10 (duplicated), the time of simulation has also been duplicated.
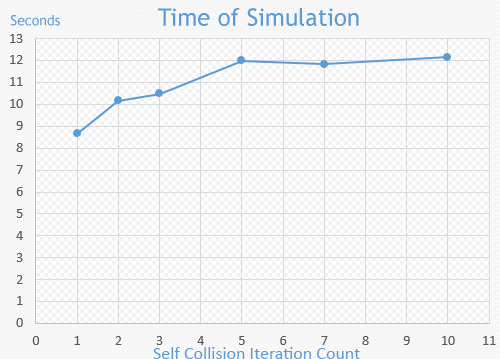
It looks like self collision iteration count is the most controversial parameter. First of all, it is possible to put a value from 1 to 10. But MD3 doesn’t save this, when the value is determined as 5 or more (you can also see this on the graph below).
In the second place, if you raise it, the simulation wouldn’t always take a turn for the better. Sometimes even vice versa.
Speed graph has an approximate logarithmic form. It means that, at first, simulation time increases, and then, starting from a certain value, ceases to increase, no matter how much you put the parameter up:

The idea is that this parameter is aimed to improve the simulation only in those places where fabric touches itself. And, as the increasing of this parameter is given almost for nothing, I used to raise it up to the maximum. But then I realized that simulation quality isn’t the gainer by it at all.
If there are places where fabric mesh is puzzled by avatar (in armpits or at elbows), especially when self collision iteration count parameter is overstated up to 5 and more, fabric begins to explode impulsively. But when self collision iteration count is set on 1, it doesn’t. I.e. these errors of puzzled fabric are ignored.
But in practice it is a common problem – many penetrations of mesh into mesh. That’s why, if you don’t want your fabric to explode, trying to pull itself out of itself, you should try to keep this parameter at 1.
You can see such explosions on the video below:
Conclusion: you shouldn’t set too high the parameter of self-penetration (5 is a maximum value, the further growth is unnecessary. I think, it just physically doesn’t work with more than five). Of course, you may try if all other methods were helpless and you are sure that your avatar won’t puzzle the fabric.
I’ve noticed that when such a glitch happens with fabric (it was jammed somewhere between the mesh and it starts to get tangled or a sudden movement of the avatar „tears“ it), the program hangs the whole system (i.e. all cores are running at 100%). RAM consumption also increase fast and steadily.
If you see these symptoms on your computer, you can immediately kill the process “MD3_Personal_x64.exe”. There is almost no chances that you will be able to stop such simulation.
To avoid this, you need to monitor carefully a bunch of factors. I’m going to mention some of them below. Most buggy are on the top.
– the fabric shouldn’t be pinched between the mesh;
– if jamming occurs, self collision iteration count should be set at 1;
– avatar and any of its parts shouldn’t move too fast and sharply;
– layer number should match with the fabric;
– there should be little difference in polygons density of the adjoining fabrics;
– shrinkage weft and warp parameters shouldn’t be used without extreme necessity (shrinking and stretching of the fabric horizontal and vertical );
– elastic parameter shouldn’t be used without extreme necessity as well (sometimes it’s better to overestimate frictional force rather than pull cloth together with eraser).
The attribute for # of cpu in use, does MD mean processors or cores?
and what’s a far high to low damping parameter.