

 Auto
Auto
 Camion
 Autobus
 Motociclette
 Militare
 Elettronica
 Armi
Armi
 Edifici
 Aerei
Aerei
 Arredamento
 Personaggi
 Animali
 Veicolo spaziale
 Cibo
Cibo
 Nave
Nave
Tutti
Good day to everyone! Today we will continue our series of lessons in making 3D car models.

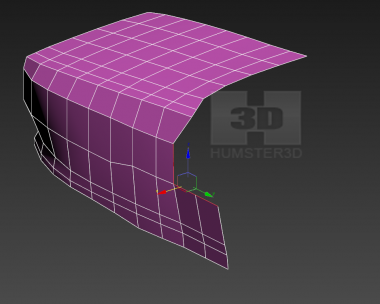
At the present moment we have a block out. And it is a high time to turn it into a fully fledged car. And the first thing we need to do is wheel arches. Well, let’s start!
Our wheel arches have an interesting feature. They are intersected by the stiffening rib closer to the top part. The problem is that the operation that create a bevel on the wing, as well will create a bevel on the arch itself. Now we are going to do it and you will see it clearly. And at the same time I will show you how to fix it. Oh, yeah… If we want to see this, we need to apply “TurboSmooth” in order to make our model smoothed.

IMPORTANT: Use “TurboSmooth” in such a way that it is in the first place in the modifier stack. Especially it is important when the model has symmetry. You may experiment with this and see what happens.

We should at once set a relief on the wing to see the complete picture.


Let’s make a backup copy of the model. Just in case.
Now we are going to cut out the wheel arch and you will see immediately the effect I mentioned earlier. Outline the arch with the help of the tool “Cut”.


And remove the polygons that hide our arch.


As you can see, it didn’t come out quite accurate. If it turned out very bad at all – upload the backup copy. But we continue working here. Unfortunately, we have no magic wand to fix it and so we are going to adjust it manually. At the same time correct topology because we have a lot of cut quads now. Select these edge rings here and use “flow connect” tool.


Now connect these red dots here.

Next, you need to connect these edges and then correct topology.


Although the arch is almost regular we still have to get rid of these triangles; besides, it is necessary to set a convexity for the wing.


And we increase the detail of the front bumper.


Now remember that I had said once. There are no parts of any car body that are absolutely level. Ok… Let’s have a look at this picture to make ourselves sure. Please, pay your attention to the place in the green rectangle. Here it becomes obvious that the wing is slightly convex. I even put a straight line near to make it more vivid.

We need to follow this form. But don’t forget that this curvature must cover the door and the rear wing. Select these edges and move them a little.


And we should also fix the edge that gives a relief to the wing.


Nice? I bet! Unfortunately, we have no time to relax. There is still a lot of work to do, let’s continue. We are going to start making the back wheel arch. The situation here is somewhat simpler because the edge along the wing goes above the arch without crossing it.


It would be better not touch these triangles so far, we will easily get rid of them later, when the body is cut into parts.


Since the body of our Lancia is very segmented, we will separate the front part of the car from the rest of the body for our convenience. But you have to be prepared for this and consider everything. We need to draw another line between the windshield and the hood and it can be separated. But this is a special case in the car modelling practice. In 95% of cases you need to separate car body into parts in the end. Let’s proceed.


And don’t forget to turn off “Constraints”.


Now copy symmetry modifier and apply it to the front part of the car, and then do the same with TurboSmooth.


Then remove the hindering parts.


And we proceed to the detailed elaboration of the bumper, but don’t be in a hurry to separate it. Looking through the pictures of the real Lancia Rally 037 your will realize yourselves how to do this or that element.


Now we need to smooth the mesh because this method of the detailed elaboration makes smooth lines crooked. Viewing the model from different angles you will immediately see all defects.

Please, pay your attention at such moments: the line there doesn’t seem uninterrupted. Nevertheless, the design was developed in collaboration with famous Italian firm “Pininfarina”. And “Pininfarina” means that all lines are in a harmony with each other. One way or another, don’t ever hesitate to correct the irregularities. It will be too late to do this afterwards and it will take a lot of work and time. The easiest way is to correct everything in the early stages.


Perhaps, it will be enough for today. Next time we will continue.
Have a nice render!


)
great job
a great one!
Good work. Found your blog through a link at some modeling forum. Very interesting.
Very interesting and great work. Thank you.
Simple and beautiful work. Thank you.
I enjoyed following this tutorial. I was using youtube time-lapses to learn how to model cars in 3ds Max but it’s nice to actually get a step by step of the process to hone in on some of the crucial procedures that you would most likely miss in these quick time-lapses.
Thank you!