 Auto
Auto
 Camion
 Autobus
 Motociclette
 Militare
 Elettronica
 Armi
Armi
 Edifici
 Aerei
Aerei
 Arredamento
 Personaggi
 Animali
 Veicolo spaziale
 Cibo
Cibo
 Nave
Nave
Tutti
It all started after I watched a couple of Grant Warwick’s hard surface modeling videos. It really made me want to model a car by applying the newly learned techniques.
I was on a look-out for a challenging shape for a car to model. Soon enough I stumbled upon Lamborghini Veneno. Its crazy design struck me as something fairly complex and even slightly intimidating for someone who hadn’t really been modeling cars as much.
While I was modeling, the Hum3D Car Rendering Competition blipped on my radar, providing the perfect time-frame and motivation to finish the model and present it nicely.
I had to spend some time to understand the way shapes flow on Veneno’s body. I collected and studied a fair bunch of photos of this beastly vehicle. Here you can see some of the key images.
A new thing I tried for the first time was to use a vector blueprint and to bring the outline in 3ds Max as an editable spline. This proved pretty useful as I could switch to wireframe mode without losing the sight of my reference.
During the modeling process I made extensive use of the ‘constrain to edge/face/normal’ functions (found in Editable Poly mode) that dramatically improved my precision and speed. I mapped them to Alt +2 to 4, respectively. Alt +1 would disable the constraint. And q would toggle back and forth between the end result (an applied TurboSmooth modifier in my case).
As always the fun bit for me is to figure out an optimal topology to get good shading results.
For the holes in the rims I initially modeled one section, then set its pivot to the wheel centre and array-instanced it to cover a 360° range. To refine the shape I would only have to tweak one of the instances and see the rest of them update as I went on. Once I was happy with the look, I collapsed meshes into one and merged any loose vertices.
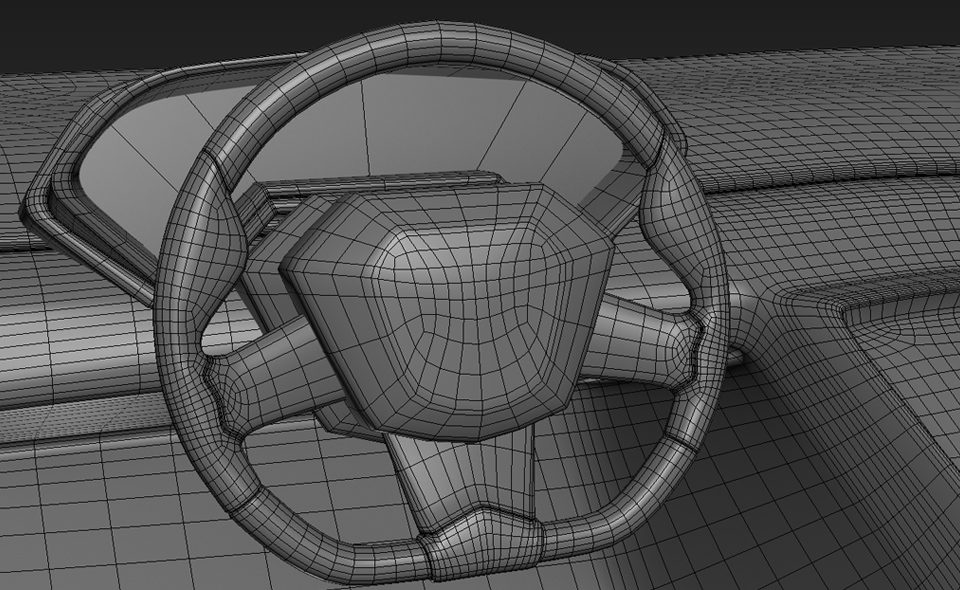
When dealing with seams where two materials meet, I have found that adding a Push modifier creates a bit of nice tension, thus helping with realism. You can see I used it on the steering wheel to “fill” and “plump-up” the areas with the inwards extruded edges.
The finished model (without some transparent elements).
I knew from the start that I wanted to put this car in a night time scene. After some visual research I concluded that I want to add rain and bright lights, which would be a nice compositing challenge as well. Here you can see some of the images that informed my decisions.
Building the scene, choosing the right camera angle and figuring out the lighting fused together into a singular creative process.
Note: The background buildings and trees that I used are all stock models.
During the road texturing process I discovered the substance map, which is a procedural texture map with tweakable parameters and convenient (linked) outputs such as diffuse, normal, bump, specular, height and displacement. I ended up using this formy road material.
Another fun task was to create the rain. In this scene I identified three separate states for the water – the water trickling down the car body, the droplets falling from the sky and the rain splashes on the ground (and on the car).
Here is a pFlow system that generated the falling droplets (more like streaks in this case) and the splashes on the car and on the ground. Basically, it produces 4000 droplets that are falling down against the car and against the ground. Upon impact each droplet (red) spawns a couple more (white) that get sent in the opposite direction (with a slight variation) to simulate a splash.
More challenging task was to create the water that is trickling down the curves of the car. Here is an example of what I attempted to achieve.
So basically the whole surface is covered with various size droplets. Then there are moving trails of water that consume all the small droplets in their way. So these pFlow systems do exactly that (This is based on a water condensation tutorial on Youtube).
The “Static Drops” system covers the surface with more or less equally distributed droplets (blue).
The “keep apart” function pushes static droplets away from water streams. If the speed of a static droplet is larger than zero (right after being in contact with water stream), then it is deleted, thus creating the illusion of being swallowed up by the stream. The “Water Trails” system particles (white) just follow the surface of the car (being affected by a subtle, turbulent wind) and spawn a trail of secondary particles (red) that shrink over time.
Once I was happy with the look of the simulation, I used Frost to mesh the particles into geometry. I find Frost way more robust than the native Blobmesh.
This whole process was fairly heavy so I split the car into separate pieces to go easy on my computer.
Here is an image of all the droplets combined.
Lighting-wise I used an HDR map in the environment slot along with various self-illuminating objects and lights in the scene. Here is a screenshot of the light layout.
After Effects is still my favorite compositing tool. Here you can see all the layers involved in the composite. I output quite a few render passes to begin with, but ended up discarding a lot of them because I was pretty happy with the initial 3D render straight out from V-ray. The image still received a standard Ambient Occlusion, DOF and color correction treatments. I have attached an animated gif that should highlight the layering of the effects.
Nice Tutorial! I think the only car that is harder to model than the Veneno is the Lamborghini Egoísta. I’m currently modeling a 2016 Dodge Challenger Hellcat.
can u post a tutorial of this on youtube
I try to make some kind of car body as you can do, I like your sportive style, I spend many nights on watching at sportive car photos and drawing at the same time but the level isn’t soo high, I study the putonghua with dictionaries. I think your work is very good, congratulations!