 Auto
Auto
 Camion
 Autobus
 Motociclette
 Militare
 Elettronica
 Armi
Armi
 Edifici
 Aerei
Aerei
 Arredamento
 Personaggi
 Animali
 Veicolo spaziale
 Cibo
Cibo
 Nave
Nave
Tutti
As always, everything starts with an idea. I had an intention to do something in the atmosphere of America in the 30’s with typical architecture and entourage of that period of time long before, but it wasn’t realized at once. One day I was looking pictures on the internet and came across an old photo (I think, the beginning of the 20th century). There was everything: large area, stone paving, cars, trams, crowds, etc, and all these things resembled the image of the future render in my head. As they say, it sunk deep into my mind. At first I convinced myself that it would be impossible because of the amount of work. However, I decided to try and make at least one car model. Searching for references I came across a very interesting website – there were hundreds (!) of pictures of that epoch! Unfortunately, the link was lost:( But almost all those pictures are saved on my computer. There was a photo among them that impressed me the most:
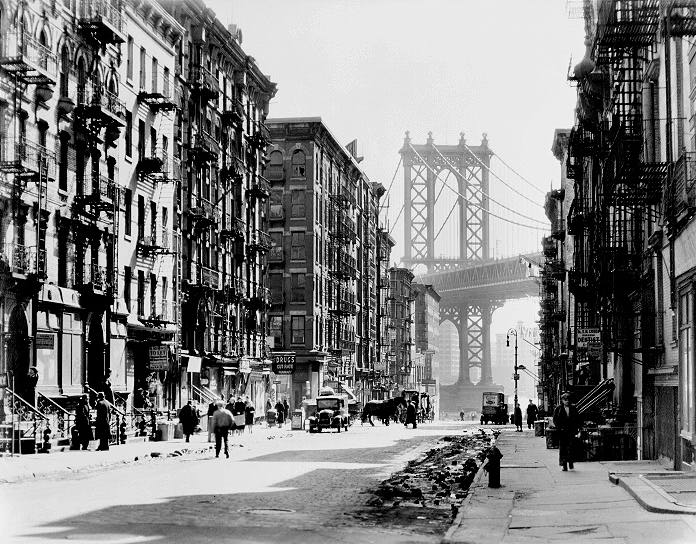
I don’t know what exactly impressed me in this photo, but I was staring at it for a long time.
The next step was the creation of scene concept. I decided for myself not to make an exact copy, but a free interpretation. So I quickly made a sketch of the future scene out of cubes.
For me the most important during this stage was to find the right angle for camera and try to keep up the real scene scale. I placed the camera and blocked it straightaway for not to move it in the future.
After this I proceeded to the most interesting, as I thought at that moment, – to the modeling of automobiles. I made them from photos, and there is nothing more to tell about it:)
The next large object was the bridge. It wasn’t hard to find the necessary information about its structure. At that time I realized that there would be thousands of different objects in the scene and many of them would be repeated a couple of times. Therefore, based on the previous experience, I tried to organize the work process from the very beginning: I modeled a tube, gave named it, gave a serial number and unfolded it. To get a beautiful model in the end is one thing, but texturing and working with it is another.
It was far more difficult with buildings. Despite the big amount of photos and pictures, they were all black and white and it was very hard to see the details on them. So I spent more time on the modeling of buildings that have rather simple geometry than on the modeling of automobiles. To say the truth, there are only four buildings in the scene. The others – their variations.
As soon as new objects were made, I added them into the scene and at the same time began setting a test render.
I found the angle for sun to shine from. I tried a lot of variants and when the shadow on the houses was on the left side I realized that it was nice. I must say that lighting and render were remade during the work process several times. But the base was permanent – standard Physical Sun and Sky of Mental Ray.
After dealing with large objects, I started making small things, immediately preparing the models for the future work.
Then I proceeded to the elaboration of sidewalks. I tried several options. Using Z-brush I made crumbled bricks and border. Everything looked good, but I didn’t know how to move all this beauty into Maya without losing its charm. I tried displacement, tried normal maps, but wasn’t satisfied with quality and displacement render that made my computer freeze up. As a result, I decided to cut some bricks in Maya and copy them all over the scene.
The work process was chaotic enough with constant fixing, improving, adjusting and additional modeling.
My next step was the city across the bridge. Again, I placed some cubes and began to work them out. I wasn’t really tied up with it because they were placed at a great distance from the camera and could be hazed straight away, forming aerial perspective. At the initial stage, it looked like this:
On the whole here ends the modeling process. But there was one moot point at that time: would there be some people? Chronologically, people were the last thing I added to the scene, and it happened only when everything was textured and after a part of the post-processing (which, by the way, began almost simultaneously with texturing).
Without thinking twice, I decided to make a simple man rigged model, create several types of jackets, trousers, shoes, shirts and hats, then put it in a few different poses and made folds on their clothes. And that’s it! It seemed to me that it would be easier than sculpting each pose separately. The problem was that at that time I hadn’t created in Maya a simple bone not saying about the whole rig. It took a whole month to set up a normal rig (“Digital Tutors – Character Rigging for Production in Maya 2011” – is a wonderful lesson). Maybe, I’ve done more than it should have been made. But looking back, I’m a very grateful that suffered all this and completed the task, because knowledge is never superfluous.
This results in a set of these gentlemen here:
However, not all of them got into the final image.
And this is where begun the most difficult process for me – texturing. It took 60% of the whole working time (mostly because of my “extra powerful” laptop, where everything took place, but it was not only this). During the modeling stage I decided to increase the resolution up to 3840 pixels wide. This imposed certain requirements on textures. For example, the resolution of walls texture – 4k. All objects were unfolded and joined on materials. Ambient occlusion was baked on them, and then I applied textures in Adobe Photoshop, sometimes I needed to draw some additional things. I tried to do everything without scans (such as UVWMap in 3ds Max) – it came out flat and poorly controlled. That’s why I decided to go a more complex way, and it took far more time.
It was also a problem picking up appropriate colors for different elements. Modern photos showed me that such buildings have completely different colors. For example, bright red walls, bright yellow cornice, black window frames, etc. But I don’t want it. I wanted harmony:) So I had to do a lot of tests before I found what I looked for. In general, color solution was a major difficulty for me.
Another problem was mud. I must say that the idea of puddles didn’t come immediately. I had been trying displacement with paving stones for a long time. There were some variants with dirty and dusty asphalt, but it never came out interesting. Then one day my girlfriend expressed the idea that the atmosphere of the picture reminded early morning. At once I built a chain of thought: night-rain-morning-puddles. Reflections on wet road should look interesting, I thought, and again began paving stones displacement, but now with reflector map. Textures with 4k size were not enough and I had to make it 8k (my laptop didn’t like at all).
I had to seek a balance, where puddles displacement is not so strong and the color of texture should be darker, and where there is no water – on the contrary.
Finishing texturing process I was surprised to find that if the image is reflected horizontally, it becomes more interesting. So I decided that my final render will be reflected. But it’s difficult to do it Maya, toooooooo difficult. I reflected all textures with inscriptions and all letters that were in the scene (on the signboards).
After all objects were drawn and textures assigned I added some rubbish on the ground.
As I wrote above, lighting and rendering are standard Physical Sun and Sky. There were some attempts to make my own HDRI, but they led to nothing. The only thing that I had to change was to add contrast (Multiplier = 0.3). I put Lanczos filter. The picture became clear and small objects such as windows on the buildings across the bridge ceased to be a simple pixel porridge.
After this I did the final render. It was made only in three steps: beauty, ambient occlusion and Z-depth.
There was nothing unusual during post processing:) With no plan of actions I did everything to my taste. This process was rather chaotic.
The first thing I did, I fixed some bugs with texturing and rendering. After that, I made a color correction. The layers that add glowing effect (some may call it a blur) were made very simple: I merged all layers that I had in one and blurred it hard using Gaussian blur filter.
In general, after this my picture got its final look. It remained only to add some mud on the buildings and cars.
That’s all, actually :)
Thank you for your attention! Have a good luck!)
Your stuff is so cool man. Love it.