

 車
車
 トラック
トラック
 バス
バス
 オートバイ
オートバイ
 ミリタリー
ミリタリー
 電子機器
電子機器
 銃
銃
 建物
建物
 航空機
航空機
 家具
家具
 キャラクター
 動物
動物
 探査機
探査機
 食品
食品
 船
船
っと見る
Hello everybody! Today we are going to continue designing Lancia Rally 037 model. As you remember, during the previous lessons we were making the sketch, we were drawing the general shape of the car and we were taking care only about proportions and outlines. Now we will proceed to the detailed elaboration of our marvelous model.
To do this you will need the following things:
A. A little patience.
B. A sharp-sighted eye.
C. And some ice-cream.
Ok, may be you won’t need ice cream, but, you know, it’s never redundant anyway :)

Yes, that is a real sharp-sighted eye; we are going to need just something like this.
Please pay your attention that the main function of Lancia Rally 037 was the participation in the group B rally. And, yes, we are drawing a rally car, of course. But, it was necessary for the company to build two hundred road versions of the car before taking part in the group B rally. That’s why Stradale version, for example, is a little bit different both in its interior and in outward appearance. The main difference is headlights and taillights, as well as the absence of spoiler in the road version. Other elements remained practically unchanged; therefore, while drawing headlights, we are not going to take into account the models without spoiler and sports coloring.
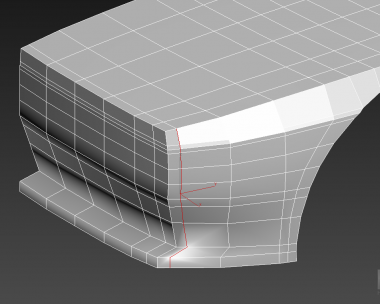
That’s the headlights we will try to do now.

Good, let’s begin. Now we are going to set the detailed elaboration, but, so far, we don’t cut the model into parts. This will permit us to have a control on the curvature and we will be able to see our mistakes at once.
We select this loop and fit it to the blueprint.

And now let’s reduce the scale a little.


The same should be done with these loops, so that our mesh is even and regular.


Now we need to outline hood air vents. I draw your attention to the fact that to make any surface you should have a row of at least two polygons. Because, if it is a one polygonal row, the surface will be flat, and we already know that all surfaces of the automotive body have bends, curves and streamlining. Even the Soviet Lada has some streamlining. So, before outlining the vents, we should prepare for this our model.


We need to set all the lines of the already existing edges. And only then we will add the missing ones.
Now we make this area even and get a nice flow.


In order to check whether in came out good or not look at the model from different angles – you will see all the irregularities.
This perspective shows us that these points are standing out from the others.


Please note that it will be much easier to set the line pointed with yellow arrows after we separate the hood. Now we set only the line pointed with red arrows.


After this smooth at once the mesh because the mere adding of edge loop with the help of the tool “connect” creates flat sections.

This bend have appeared because we added edge loop. Just as before, such moments must be corrected immediately. Maybe someone has already got tired of me telling you over and over again hearing that errors should be corrected at once, but I assure you that there are still a lot of people who put it off until later.

You need to move apart the chosen loops in order to make everything even and equal.

So, let’s set this change and at once prepare a place for the latch here.

Now we can kill two birds with one stone. We will add edges for the change on the hood, and then we will extend these edges so that they become a blank for the future latch.


We need this loop because without it the rim will be flat (blue arrow).
Next, we select the loop…

chamfer into two segments…

connect these edges…


and correct a bit the mesh.

We should also take into consideration that we have a 3D model and everything should be straightened in three coordinates at once.
It isn’t clearly seen, but we have some flat parts here, and we know how to fix them.

We just have to set the curvature manually. Do it by eye, but don’t overdo. I’m not going to show you this in the pictures because you won’t see anything there anyway. Nevertheless, the ultimate model can have some blurry blinks in that place, so you have to do carefully a normal curvature there.
Now let’s pass on to the hood.


As you can see, the hood itself is a little bit recessed. This recess can be easily set with the help of the tool “cut”.

You have selected the tool and now you should do three clicks.

If we want the hood to save its curvature but to be recessed at the same time, the best way is to use FFD. It works with sub-object levels as well. To do this we select these polygons and at once apply FFD modifier (2x2x2).


Turn off “TurboSmooth” and “Symmetry” for a while. As you can see, FFD was applied only to the selected section.
And now just move by eye these points a little bit down.


Right click on the FFD modifier, and then “Collapse to”.


Using this method we have saved the curvature of the hood, which was made with a great difficulty earlier. And the most importantly – we did it quickly.
Now we need to move these edges down a bit, so that they don’t stand out from the overall trend.


Although the blueprint tells us that here we have a straight line, we know that people make blueprints, and so it always can contain mistakes. Of course, if you have in your hands an engineering drawing, by which the production occurs, you can trust it implicitly.

We need to move one point slightly to the left. Someone may think that this is just a waste of time. But the devil is in the details, after all. And we want to draw as realistic car as possible. So, such moments should be worked out.


Here is the next case when the blueprint is lying. The relief on the hood has a curve crossed with the verge of the cover.

But according to the photos it has more rectangular shape and the edge of the relief crosses the verge of the cover with a straight line.

And now this is just the case when we can derive the maximum benefit from the situation. First of all, we will make the more accurate shape, and, second, such form is much easier to make.
We use again the tool “Cut”. But don’t draw out the shape which you see on the blueprint. We have already proved that this shape is not right. We just draw a rectangle with the help of the tool “Cut”.


And one more thing: when all the parts will be separated from each other, there will be an inexpressive form here.

Of course, we are going to correct this immediately using the tool “Cut”. But for now we are leaving the five-cornered polygon, because we will fix it when we cut the model into parts.


To set the desired curvature we also add another edge loop with the help of the “flow connect”.


Next, FFD will help us again. We select the polygons…

And apply FFD (4x4x4).

Then, we select the necessary points

And we drug them up.

Right click on the FFD modifier, and then “Collapse to”.

Now, if you want to see the result, you need to add “crease” on the edges which are around of this relief.

Select the edges.

For these edges we set crease “1.0”, we turn on “TurboSmooth” and “Symmetry”, and here is the result:

As you can see, we have to elaborate the form a bit more.


We need to drag this point up a little, so that there is no tie. You are free to experiment and see the result. This will make better your understanding of how the smoothed objects are going to look.

I’ve also noticed that out relief came out a little bit unexpressive in this place. So we have to drag the points up there manually in order to make everything even and regular.


As you can see, it came out very likely.
Important: now set crease “0.0”for these edges, because it was a temporary step. In the future, we will accentuate these edges in another way.

I think, that’s enough for today. Follow the continuation of the tutorial in our blog and please write you comments if you have some questions.
Have a nice render!


)
quale programma viene usato, esiste un tutor con Solidworks ? Grazie
Hi, it’s 3ds max. We are thinking about Solidworks, maybe we will try make tutorial for it
Yes, SolidWorks would be great!
Oww!!! It’s really ,very likely.