 자동차
자동차
 트럭
트럭
 버스
버스
 모터사이클
모터사이클
 군용 차량
군용 차량
 전자 기기
전자 기기
 무기
무기
 건축물
건축물
 항공기
항공기
 가구
가구
 캐릭터
캐릭터
 동물
동물
 우주선
우주선
 음식
음식
 선박
선박
보기
Hi there, Today I’d like to show the process of making “Son of Rome at Museum”. I hope this information will help your work more or less! Ok Let’s go…
Whole process :
1. Reference
2. Modeling
3. Lighting, Camera, Rendering
4. Comp. Mats and Texture
5. Post Processing
First, began to find Rome armors pictures and photo on the internet for observing and studied light, shadow, material, shape and detail. This is very important for start my work.
My modeling workflow there are no special features on Zbrush. I start from dynamesh with low res (64 Resolution) because it’s easy for sculpt primary form (Torso and Head of human) with brush Move, hPolish, Dam_Standard and Clay. When complete sculpt primary form I used Extract for create armor and helm.
When I’m satisfied with the shape :
Step 1. Add divide 1Level with Dynamesh for clean polygon on duplicate model.
Step 2. Close Dynamesh.
Step 3. Topo with Zremesher (Target polygon count 1) on duplicate model.
Step 4. Add divide 4-5 Level on duplicate model.
Step 5. Used Project all for get all detail to new model.
Step 6. Add detail with Brush and Alpha.
Save my model to .Obj file for pass to Keyshot (or GOZ Keyshot plugin for link between Zbrush and Keyshot).
First, Lighting test with material Hard shiny plastic search for highlight and shadow on model. I’d like unsharp edge of highlight because will into the concept “Lost Armor of antiquity”. I used 3Point Sharp High 2K for this work.
Camera… Choosing view until satisfied. I like to adjust FocalLength.
Rendering… Keyshot is great quality for rendering and take no more time. I do not use special features for rendering (You can press PrtScr Display while rendering for pass to Comp in Photoshop).
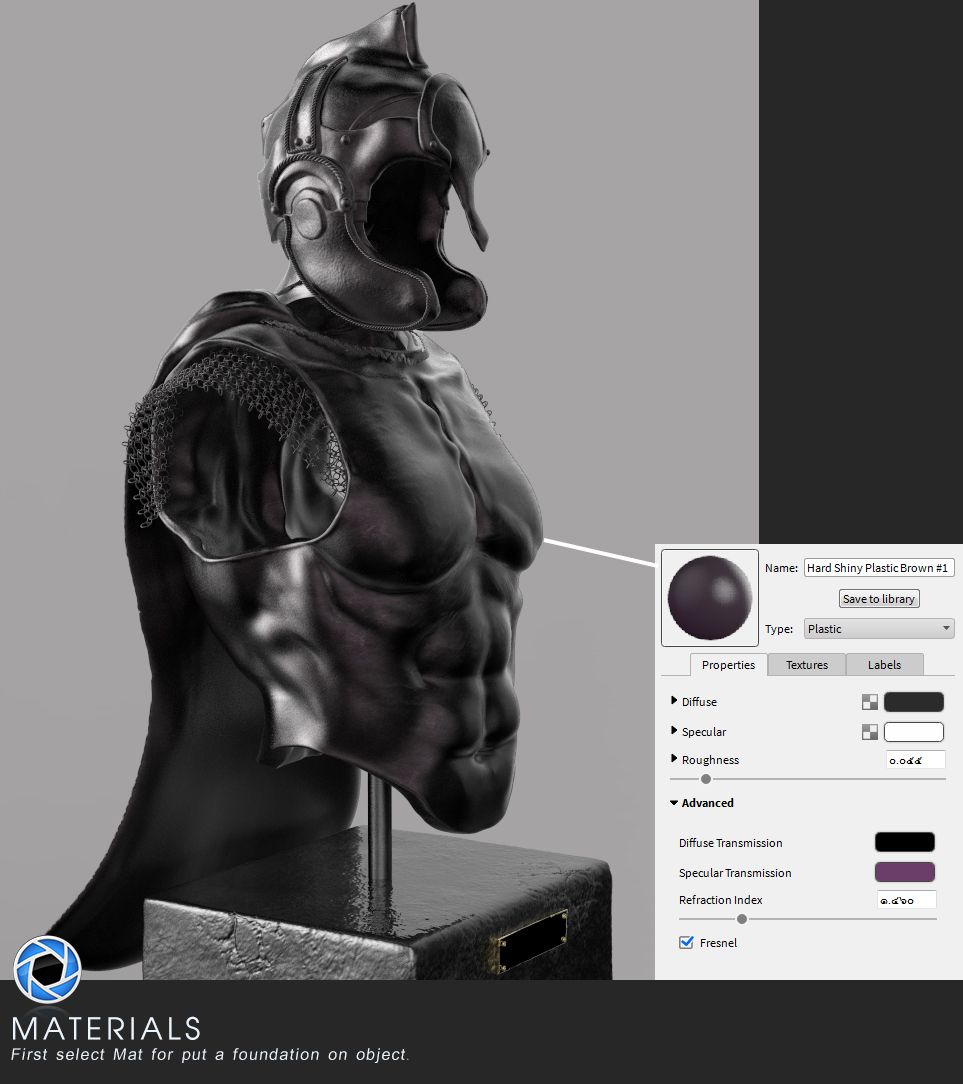
Choosing the material. First I’ve selected black material because I want to have tone “Lost Armor of antiquity”. I adjust specular transmission switch to purple color as reference pictures.
Composting with Photoshop. You can use result from rendering in Keyshot pass into newlayer in Photoshop for composite. I used Mask in newlayer and used brush white color Paint Mat or Texture into area to appear. You can used paint black color for erase.I liked to Blending mode for Texture.
This is my loop for composting.
The final step making “Son of Rome at Museum”.
After put the background image with Gaussian Blur and adjust Saturate to be appropriate with model.
I always liked to used Unsharp Mask, Auto Color, Curves, Chromatic Aberration, Vignette ,and Decrease Saturation for realistic and dark style image.
Thank you for your attention! I hope this making of “Son of Rome at Museum” will be helpful for your work.
Good luck!
Add a comment