
 Carros
 Caminhões
 Autocarros
 Motociclos
 Militar
 Eletrônicos
 Armas
Armas
 Edifícios
 Aeronaves
 Móveis
 Personagens
 Animais
 Nave Espacial
 Alimentação
 Navios
mais
Hi everyone! We continue a series of short interviews with the best artists from Hum3D competitions.
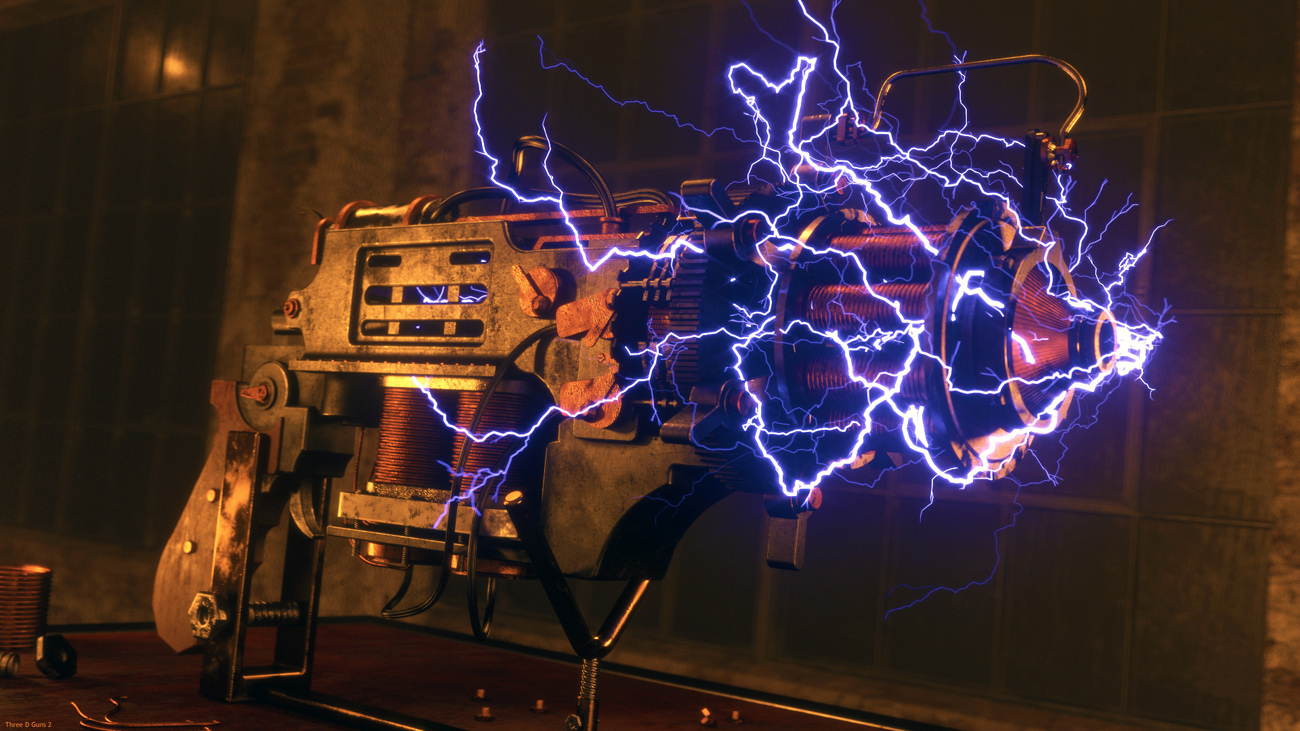
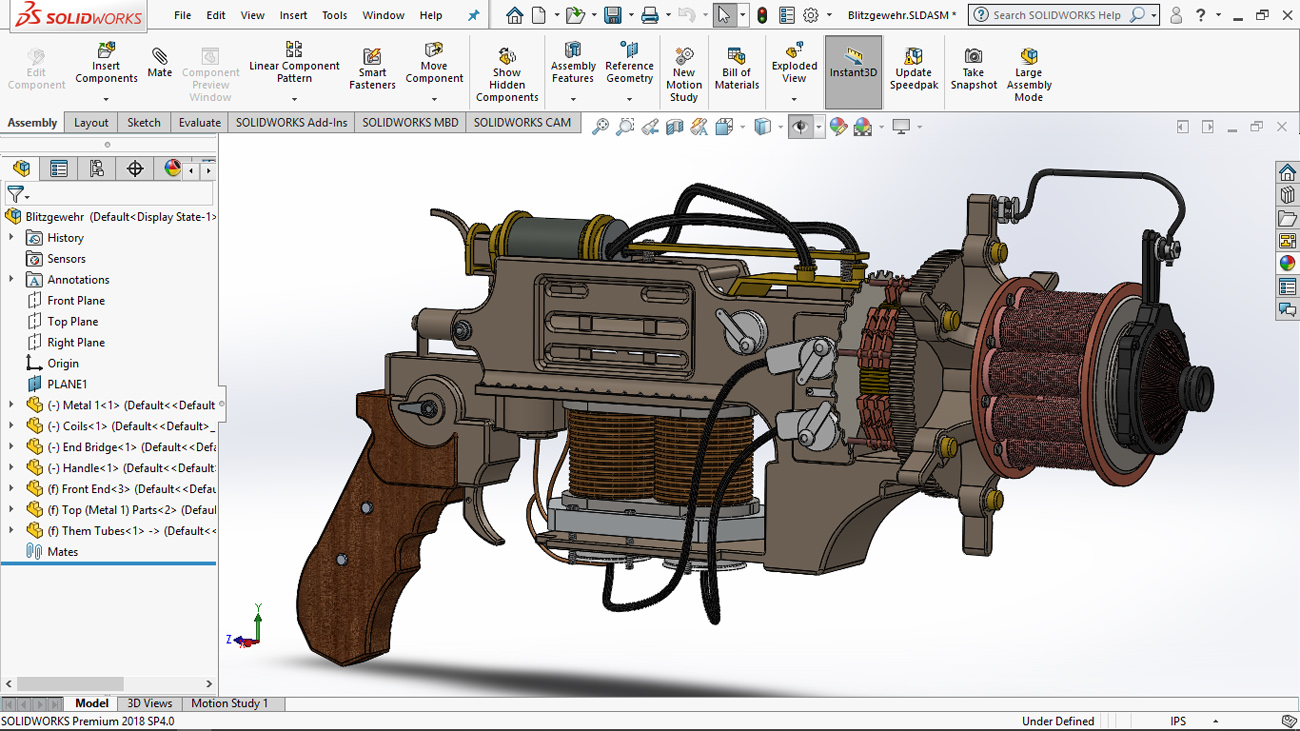
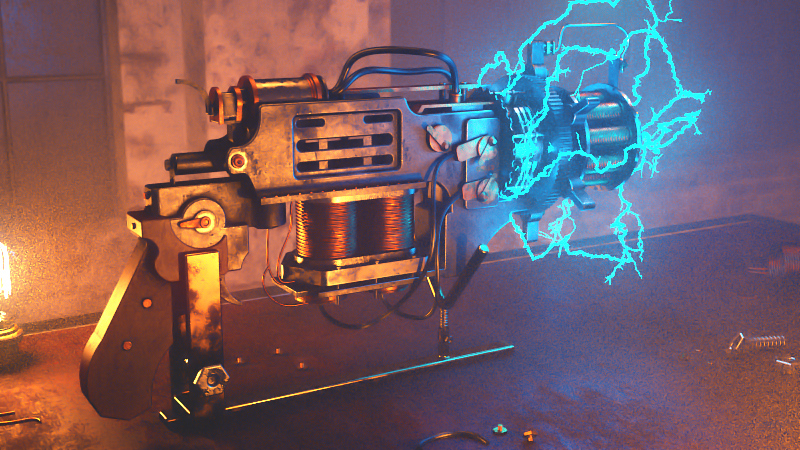
Hernán Allegroni, the author of work “BlitzGewehr” will answer on six questions and give us a look behind the work.
– Tell us a little bit about yourself. How did you become a 3D artist?
My name is Hernán Allegroni, I’m 18 years old and I live in Argentina. Currently, I’m studying industrial design, just like my brother who introduced me to the world of computer-generated imagery, about 5 years ago. One day, I saw him working with Keyshot, and was immediately blown away by the fact that a photorealistic image came out of his computer, and it could be whatever he wanted it to be. After that, I started learning how to render by myself, with tutorials I found on the Internet. First, I explored Keyshot and work many years with it, until I discovered Cinema 4D and V-ray, which opened the door to another type of scenes, and became my main software of choice.
If you are interested, you can check out some of my renderings in ArtStation.
– What’s your favorite aspect of creating 3D art? Is there something you specialize in and enjoy the most?
My favorite aspect is the actual rendering process. Everything from building a scene, lighting, materials, camera, to adjusting render settings depending on how demanding a scene is. I like having an idea and seeing how it actually changes in the process. You may start with a specific mental image, and try to replicate that. Sometimes you change because there are things you can’t do, sometimes you just try something different and realize it looks better or better captures what you want to show. That’s why I don’t draw sketches before working on a scene; I prefer to build up from an idea rather than trying to reproduce an image.
– What or who inspires you today?
I usually draw inspiration from various artists from ArtStation, such as Csaba Bánáti, beeple, Brian Sum and Khyzyl Saleem. I think ArtStation and these people provide the best sources of inspiration one can get, which are amazing works of art made by professionals.
– Please tell us your five short tips for creating realistic renders?
I’ll try to list the tips in the order they appear on my workflow:
1- When modeling, avoid leaving completely sharp or solid edges. In the real world, every edge has a certain fillet or chamfer, no matter how sharp it looks. Some are so small that may seem insignificant, but the way that light interacts with them is key to making something look as photorealistic as possible.
2- Work on your materials/textures. This is a key aspect and can be really difficult in certain situations. Try to cover as many “aspects” of the material you’re trying to make as you can, like how reflective it is, does it present imperfections, how light scatters through it, does it have some kind of bump/displacement, etc. Textures should be used when possible, as they add realism to a material. That’s especially true for surface imperfections. Also try to create your own textures, as a map that was custom-made for a certain model will look much better than a generic texture, as these don’t take into account the actual shape of the model itself.
3- Build your lighting according to the specific type of scene you’re working on. Lighting can help you build a certain mood, highlight a specific aspect or make an object look amazing. Thus, a fundamental aspect you should take into account is what type of scene you’re trying to make. For example, if my scene is presenting an object (like my entry for the last contest, “Blitzgewehr”), I’ll build the lighting around the object, adapting it to its shape. If my object has a curve I want to highlight, I’ll place a light that will reflect in that curve. If its shape is defined by the silhouette, I’ll use backlighting. The process will be similar to a studio rendering, even if I have an environment behind. However, if I’m making a more artistic image, I’ll consider other aspects when lighting my scene, like the mood I want it to have, or a color palette. For example, if I use many warm, intense lights, the result will show a completely different feeling than a scene lit only by a single cold light source, like my work “Ruined Sci-Fi Bedroom”, which you can check on my ArtStation page.
4- Work with the Physical Camera. Or an equivalent on software that’s not V-ray. It puts a lot of extremely useful tools at your disposal. Building the take is not just positioning a camera, its experimenting with different FOV levels, adjusting exposure, zooming in or out, defining whether (and how) you’ll use Motion Blur, Depth of Field or none, etc. Dedicated camera work can turn a good rendering into an amazing one.
5- Always search reference footage. Every aspect of the scene is successfully completed only by having lots of reference footage. For example, in “Blitzgewehr”, I searched many photos of places lit by low voltage retro light bulbs (restaurants, bars, etc.,) in order to adjust the scene’s lighting. The same goes for the rays, but instead of places, I was searching for images of Tesla coils under many different lighting conditions.
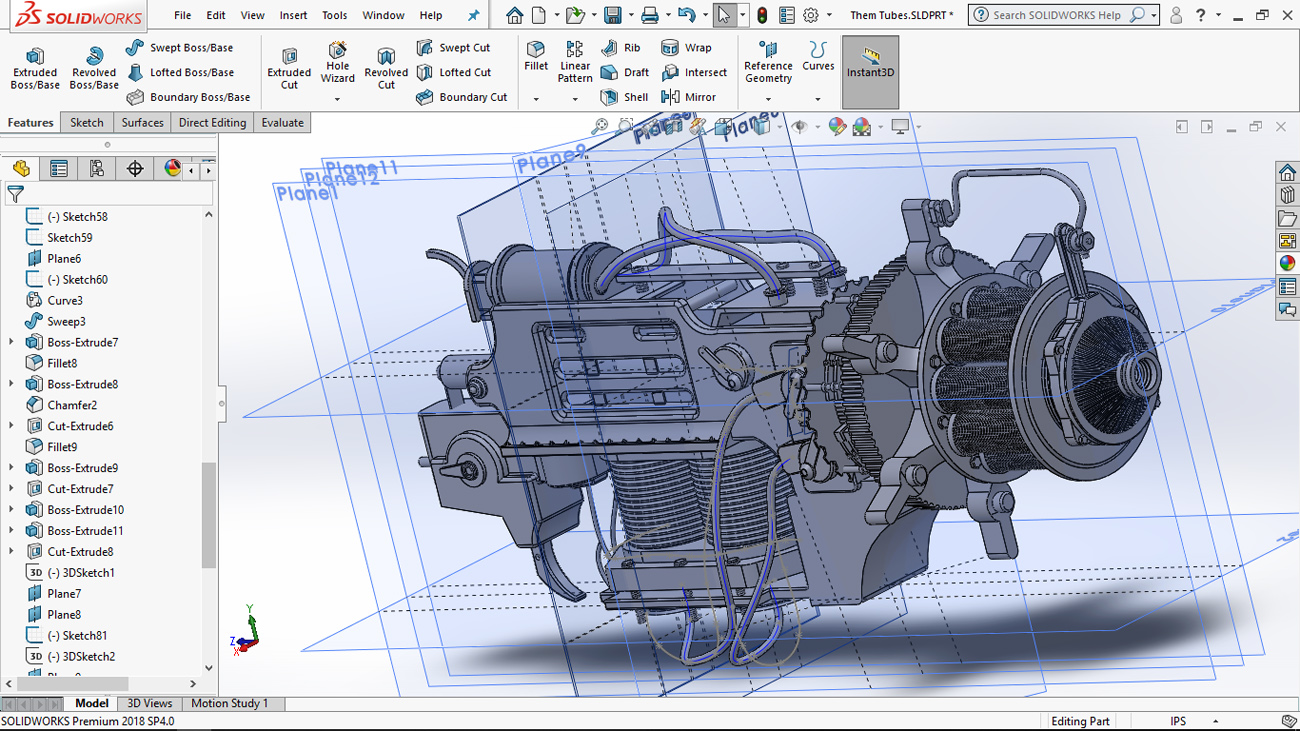
– Could you please show us any images from the work process with a short description.
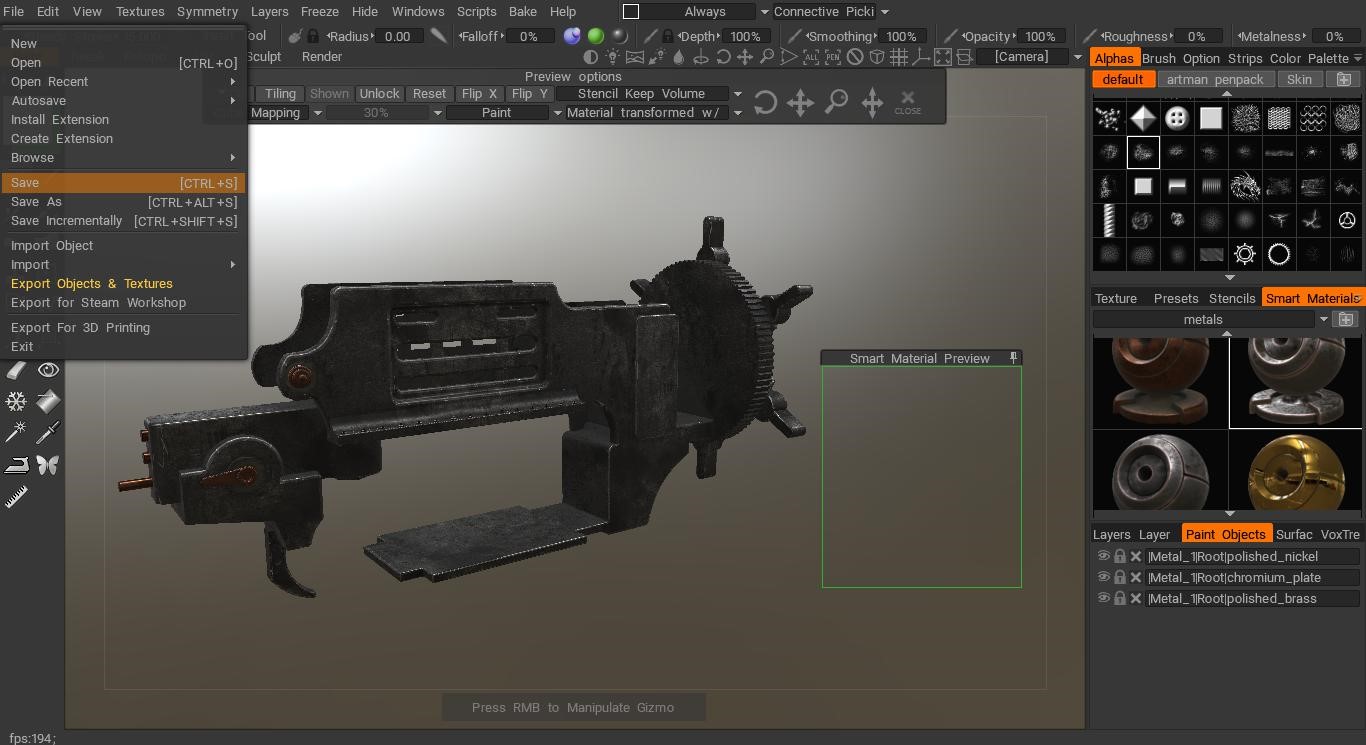
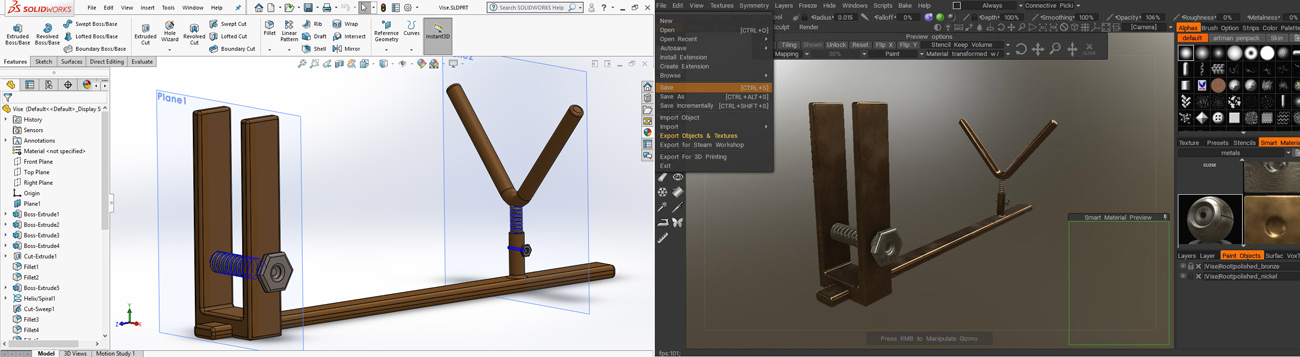
These images correspond to my “Blitzgewehr” scene. I uploaded the full process to the Hum3d Forums.
First, I began by modeling the basic shapes in Solidworks.
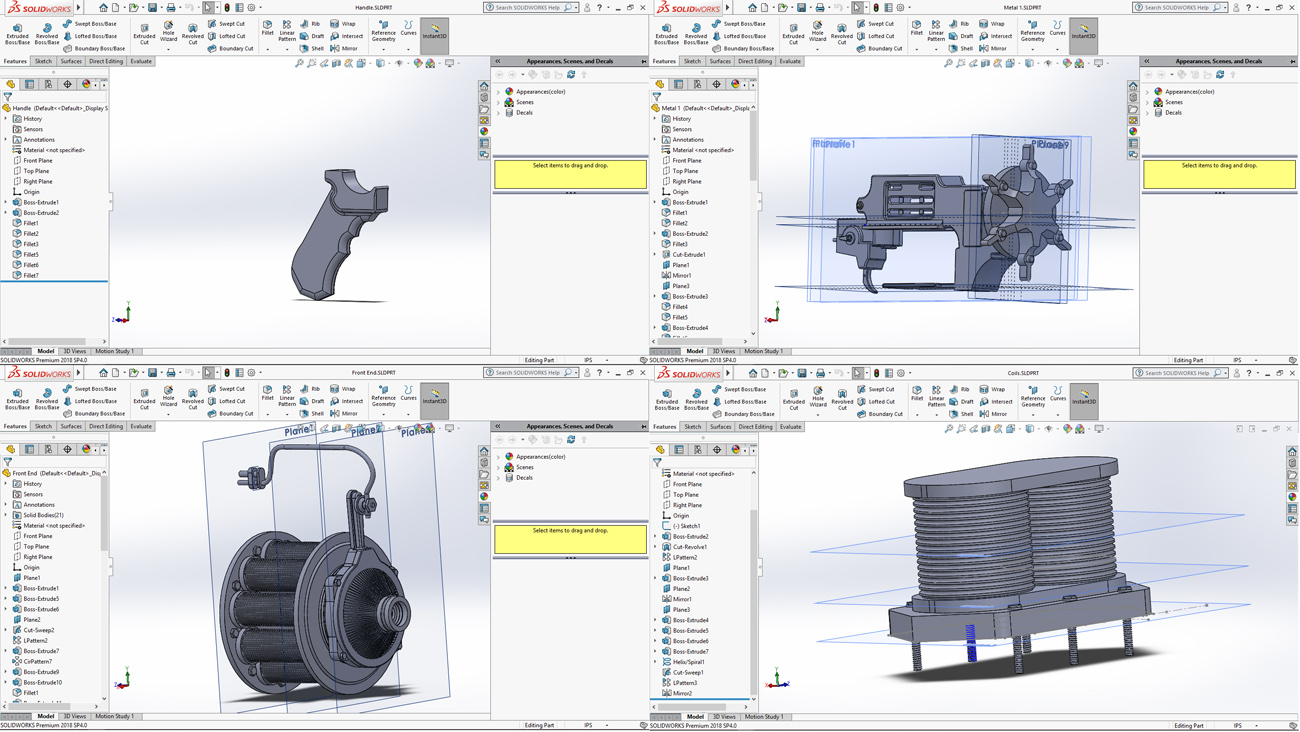
Then, I started to add details to my model.
Once I was done modeling and splitting the model into separate materials, I moved onto texturing in 3D Coat.
After that, I modeled and textured some props, like a vise and the table, and began to build the scene. I tried many different takes and versions before ending up with something I liked.
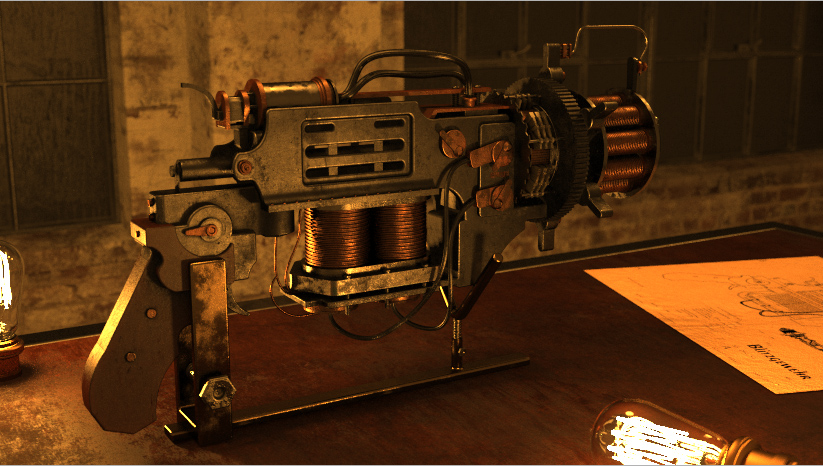
After a lot of work, the final image ended up being substantially different from what I had started with. I also incorporated V-ray’s lens effects to the image, something I had never done before.
– Which of your designs are you most proud of and why?
I’m proud of how the model looks, as modeling is not my area of expertise. Same goes for the textures. I am also proud of how the rays ended up looking because I dedicated a lot of time to make them look as close as real life tesla coil rays as possible.
If I have to choose another one of my works of which I’m proud of, I’d choose the scene “At Dawn” (which is published on my ArtStation page), because it took a lot of work and I really like how it turned out. That work also taught me how to optimize a scene, because my I5-7400 and 16 gigs of ram couldn’t handle it, so I had to learn how to reduce memory load and obtain similar lighting results with cheaper techniques, especially when using volumetric fog.


Add a comment