

 Carros
 Caminhões
 Autocarros
 Motociclos
 Militar
 Eletrônicos
 Armas
Armas
 Edifícios
 Aeronaves
 Móveis
 Personagens
 Animais
 Nave Espacial
 Alimentação
 Navios
mais
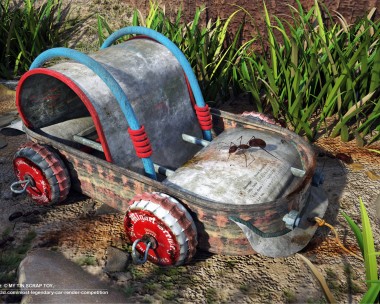
Here is a quick overview of how I created “My Childhood Perspective”. It was modelled in 3Ds Max and rendered in Mental Ray. PP in Photoshop.
I was only 7/8 years old when I first picked up a pencil and began to sketch-colouring between the lines, mostly! As my work improved, my grandma gave me a book about learning to draw in perspective. I remember very clearly that the first example in the book was how to draw an Austin Cooper (Mini) in 2 point perspective. Therefore, my piece shows my own version of an Austin Cooper coming to life out of a drawing board, in reference to the original book’s technical tutorial. A few sneaky details appear, such as the Gumball 3000 sticker, the rally being something I have followed since childhood. I designed an old-style drawing board to try and enforce the time period that my piece is set in. This render hopefully brings my technical drawing ability round in full circle- from childhood, to the 3d work I now make a career out of.
With the Mini firmly in my mind for modelling, I set out to find reference and GA drawings of the car. It was key that I collected as many different views as possible in order to put together a good mental image of the car. Once the GA drawings were ready to go, I placed them in 3ds Max on planes and roughly built a car box, of which I could see the contours of the Mini. After looking back and forth many times, to make sure I was keeping on track, the Mini started to take shape: no windows or details yet, purely the main shell. The windows were then detached from the main mesh and kept safe, to be fitted back in place later. Extruding window edges and body details came next. I choose mainly to work from reference shots, because it allows a quick, artistic representation of the object I’m modelling, and it also gets me continuously looking back and forth from the screen, preventing my eyes getting lazy on the small details.


Most of the modelling stages were completed in my lunch hours, so it became a test of speed and accuracy. When I start a project I get wrapped up in it and cannot put it down, so even after the deadline I was still thinking of how different aspects could be improved!


As the model progressed, more and more details were required, along with more reference shots. The mesh becomes denser and smooth details were then crafted. The wheels, door handles and grill came last, making the model complete.


Finally I added the environment, to support the story and give meaning to the perspective. The drawing board and sub-objects then supported the drawing feel that the render would then take on.

1st step when the model is complete is to run a white render with lighting in place; personally I love the “white and light” render as it can show off key details that can sometimes get lost in final renders. Knowing this I could then bring these back in within post process. This 1st step is also quick – to show results of your modelling. The model begins to take on more details during the test render, because I always notice little details that I want to add.

I started off with the base green texture to get the light dropping off of it just right. I then added the scuffs and bump-maps around the wheel arches and front end of the car. I wanted to give it a used look, to subtly get some details. Windows and metals came next, closely followed by the roof. All of the textures were created in Photoshop, with only a few being UVW unwrapped- UV mapping in “box” or “plane” did the trick model of the time.

The drawing of the table was taken from the wireframe model of the car once drawn up and completed in Photoshop. Next, it was saved down to a jpeg at 72dpi, keeping the render nicely quick and clean, and then it was placed into the model. Uv mapping was used next, as a “plane” to get it into the correct placement.


The backplate was a photo of our meeting room from where I work at http://triad.uk.com/ as it provided a nice, soft light source.
Once complete I separated out the render passes and re-worked some details up in Photoshop to give it the final look. Lastly, I overlayed some “colour layers” picking colour from the backplate, over the top and onto the top layer so that the images truly gelled together.


My personal links: Facebook, Website, Portfolio.
Thank you,
Kevin Boulton


Add a comment