

 Carros
 Caminhões
 Autocarros
 Motociclos
 Militar
 Eletrônicos
 Armas
Armas
 Edifícios
 Aeronaves
 Móveis
 Personagens
 Animais
 Nave Espacial
 Alimentação
 Navios
mais
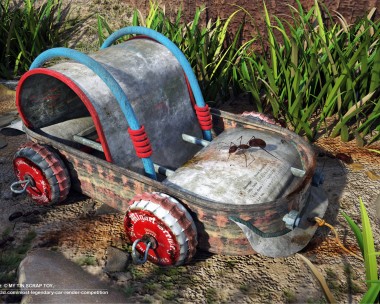
In this “Making of” I will try and cover as many steps as I can regarding the work on my last 3D piece for Humster3D challenge “Most Legendary Car”. From the very start of the project I knew that I would mostly concentrate on texturing and post production. I knew that simply modeling an awesome car and then rendering it in a studio environment is a bit too simplistic for this challenge, especially if you read the guidelines. I believe that every composition and model needs to have a story attached to it which can make that model “useful/believable”. In this article I will try and cover some basic techniques regarding modeling, since modeling itself is relatively simple and straightforward. I will also cover some texturing techniques and postproduction. I would also like to thank Humster3D for asking me to share my knowledge and write this making of; hope it can be useful to someone.
Once I saw the competition announcement I got an idea of making a post-apocalyptic piece cause I got inspired by a number of movies and TV shows such as: “I am Legend”, “The Walking Dead”, “Mad Max” etc. I then went on the internet and tried to find as many examples as I could regarding the post-apocalyptic era. I found many examples of this but instead of making a super cool car and then damaging it, I decided to make a more useful kind of car for that era; a car that that could transport and hold supplies, provide shelter and at the same time be durable. That’s when I decided to go for the “Toyota Tundra” pickup truck which looked perfect for what I had in plan. The next step is one that we all know so well, gathering as much references as you can in order to make the modeling process easier. One obstacle that I bumped on was that I only had one blueprint which showed the side of the car.

This is one of the reasons I had to download as many reference pictures from real life as I could. I think I downloaded over 50 images of real life car and particularly focusing on close ups of certain parts. I believe that this is one of the most important aspects of modeling process, especially when you are trying to model something from real life. I used to rush things and try to get to the modeling stage as fast as I could and as I result my models would often lack information, proportions would be off etc.

Reference Images
When it comes to modeling, the whole process was simple; poly modeling starting from a simple plane converted to an editable poly and then extruding edges along the surface of the vehicle based on the blueprint. The good thing is that you only need to model one half of the car and then simply use symmetry modifier in order to create the whole vehicle.
Once the main shell was done, I began making the interior and glass.
At the same time I decided to make some indents on the car with a paint deformation brush. All you then need to do is apply a turbosmooth modifier in order to sharpen the edges and make the model smoother.

Modeling Process
Once the main body of the car was done I concentrated on accessories such as: chains, bumper, road signs, barrels, crates etc. some of these accessories were not visible in the final piece because of the camera angle, but I made them anyways since until the end of the whole process I was not sure of the angle.

All of these models were made relatively fast except for the chains on the front bumper because I first had to make and modify splines along which the chain would follow; easy but takes some time because you have to make sure that the chains don’t overlap or that they don’t go into the main body of the car. Once this was done I began working on the tires of the truck. I went online and, again, gathered some reference regarding the off road tires and tire threads.
In general, I haven’t payed too much attention to the flow of the geometry, tidiness or anything else since I knew that I would not unwrap the model, or make a game model out of it . That is why I went through the modeling stage pretty fast and kept things simple. This pretty much covers the modeling process.
Now comes the fun part. The one I enjoyed the most. Everything in the scene was textured using the VrayBlend materials and sometimes I use planar and cylindrical mapping. Because of this, during the whole process I had to use mask maps which would show or hide material. The main reason why I chose to use VrayBlend materials is because I haven’t unwrapped the model, therefore I had to find a way to simulate layers in 3ds max. I would usually do this in Photoshop and add details and information through different layer but VrayBlend material enabled me to do just that without leaving 3ds max.
I will show you a number of examples of different materials and try to provide some explanations…

Car Body Material
The body of the car or the main shell, is the most complex material in the whole scene. As you can see I used a basic VrayCarPaint material which was slightly modified in order to achieve the desired look. Once this was done, I started adding layers/coats to the main material. In order to limit the effect of each coat/material, you have to use a mask map which basically tells the material where its visible and where it is not. You will not be able to see some maps in this picture because I deleted them a few days ago from my hard drive because the folder, for some reason, became corrupt.

Example of a mask map
Above you can see an example of a mask map you can use in order to help the coat material show or hide details. Basically everything that’s white will show material information and everything that’s black will hide it. I downloaded a number of these maps from the internet and especially from CG Textures which is an awesome resource. Also, by adjusting the contrast of the mask map, you can have more white/black areas in the image.

Other material examples
All other materials in the scene were created the same way; the only difference is that some of them had more coats/layers while other had less. During the whole process I discovered the true power of VrayBlend materials which will speed up my workflow in all of my future projects.
For lightning and rendering I used Vray 2.0. In order to make the Post Production phase easier, I decided to render out many other elements such as: Diffuse map, GI map, Lightning map etc. Below you can see all the render elements I rendered out.

Render Elements
Post Production was also an important part of the whole process. I spent a few hours during this stage in order to achieve the desired look.

Final Composition in Photoshop
I created around thirty layers in order to achieve the desired look. I used a number of adjustment layers such as: curves, levels, hue/saturation etc. I really enjoy this stage in all of my works because it enables you to alter your image with immediate feedback.
Below you can see the comparison between the beauty render and the final composition.

Comparison
Well guys/girls this pretty covers the whole process of my final entry for the context. The whole process took around seven or eight days. I wish I gave more attention to the environment but, like I said, I was mostly concentrating on the truck (texturing and PP). I must say that I enjoyed the whole process and learned a few new tricks, especially when it comes to VrayBlend material, it can do wonders and save time.
Thank you very much…


Add a comment